
When I purchased my first airgun, I had no idea what to expect when opening the box. To my surprise, I needed to mount the scope. As I fumbled around to get the scope mounted, I now wondered if I did it right and would I be able to hit a target. And then I remembered my Army training and zeroing your weapon.
There are many factors involved in the physics that affect the trajectory and flight of a pellet as it leaves the rifle barrel. We will not get too far into the weeds on the science. Instead, we will focus on the process of zeroing and how you can get in done in a few easy steps. I prefer plain and simple instructions.
FIVE SHOTS, MEASURE, ADJUST, REPEAT
What is zeroing?
Zeroing is merely the process of sighting in your air rifle. In the end, we want you to hit where you are aiming, and airguns don’t come out of the box with perfect aim. Since everyone will hold their air rifle differently, each rifle needs to be set-up for the individual shooter.
The process of zeroing is also needed because for the majority of air rifles we cannot manipulate the flight path of the pellet by adjusting the power.
So we need to manipulate the sighting of the air rifle, and we do this by adjusting the aim point of the scope or iron sights. Through this process, we will make the aim point, and the path of the pellet intersect at a certain distance. We want to hit where we aim.
The exception is a PCP rifle but if you’re reading a beginners guide to zeroing it is likely you didn’t purchase a PCP airgun.
Now that we know the why. Let’s get to the how.
What you need to get started with the zeroing process
– shooting stand/rest
– bullseye targets
– a variety of pellet types
– tape measure
– a dime
– a calculator, unless you’re a math genius
– cleaning kit/cleaning pellets
Firing Position
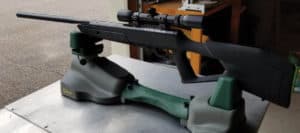
To properly zero your air rifle I recommend you find a way to place your rifle in the same position every time. A shooting rest works best, but a set of shooting bags will do the trick. It is critical to have a stable and repeatable shooting position. A consistent sight picture is the key to quick and easy zeroing.
Target
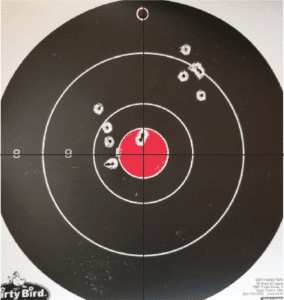
Bullseye targets provide you with a way to measure the distance from the center of your target to your shot grouping. If you can find bullseye targets with a horizontal and vertical line through the center of the bullseye, even better.
Pellets
A variety of pellets is optional but it will help you determine what pellet gives you the best results. Everyone will look through the scope differently. It is likely that you will shoot better with a specific type of pellet due to flight characteristics and your tendencies. In the end, you will be more consistent in your shot groupings, and that is what we want.
Tape Measure
Even if you are great at estimating measurements, a tape measurement is highly recommended. You know guys and measuring inches. Proper measurements will speed up the process. If you are not that concerned about a tight shot group, taking a swag at a distance will suffice.
Tools
A dime will come in handy when adjusting the scope. A screwdriver will work too.
A calculator or a math genius
Unless you are zeroing at 100 yards, you will need a calculator. Most scope dials are set up for 100 yards, and since we will be zeroing at different distances, we will have to convert a few numbers.
Cleaning kit or cleaning pellets
We DON’T recommend that you give your air rifle barrel a thorough cleaning all that often. The purpose of the cleaning when zeroing your weapon get the barrel ready for the next type of pellet. So, at most run the cleaning rod down the barrel once or shoot a couple of cleaning pellets. Air rifles are not meant to be cleaned all that often, frequently cleanings could affect your shot accuracy.
What you need to do before you start the zeroing process
The first thing you want to do is ensure your air rifle has been cleaned to the standard mentioned above.
Next, we are going to shoot 20 pellets down range making sure we have a backstop in place to stop the pellets. This is merely for safety. We don’t want pellets flying everywhere.
One thing to remember here is to use whatever pellet you plan to zero with. We need to lead the barrel before zeroing. This process helps to achieve the best accuracy.
How far should I be from my target?
Your distance from the target will depend on what you want to do with your air rifle. If you are merely planning to plink targets and have limited space, determine the normal distance, you will be shooting and use that as your zeroing distance. For plinking, I would say you would want to be 25 yards from your target.
If you plan to hunt with your airgun, you will want to determine what distance you will be away from your target and the caliber of your airgun. It will likely be in the 30 to 40-yard range.
However…
We want to start at 10 yards. We begin this close for two reasons, easy math calculations and to ensure you hit the target. Having errant shots will not help the zeroing process, we need good groupings of shots.
Your first five shots
Finally, we get to start to zero the air rifle. Oh, but first, we have to set up the shooting position. Start with setting up your rifle rest or sandbags on a table or bench. The key is to have a comfortable shooting position that won’t require you to be a contortionist to get behind the scope.
Once you have built yourself a position select a type of pellet, you will be using to zero. It is recommended to start with a pellet that is for general use, a standard domed pellet will do. Don’t start with specialty pellets.
Now we get to start shooting. Some people will say that you only need to shoot three pellets at a time to zero. We recommend five, in this case, more is better. Starting out you may have an errant shot that you can disregard as long as your other four shots are grouped.
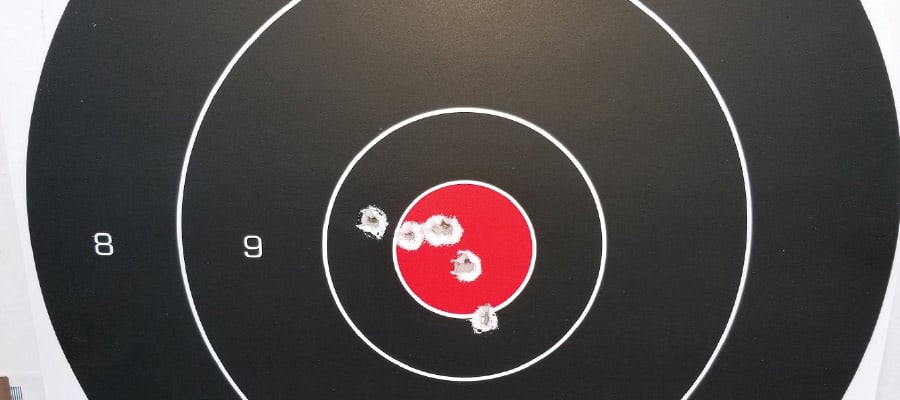
Only measure after you have fired all five pellets. Measuring after each shot will not yield the results we are looking for.
Next, you will measure the distance left or right of the bullseye as well as the up or down from the bullseye. Measure from the center of the grouping not from the individual holes in the target. Write the measurements down and head back to your air rifle.
The basics of adjusting your scope
Scope adjustment is the part of the process that will cause you the most confusion. In reality, it is simple and can quickly be reversed in you make a mistake.
This is the part where you may need a calculator.
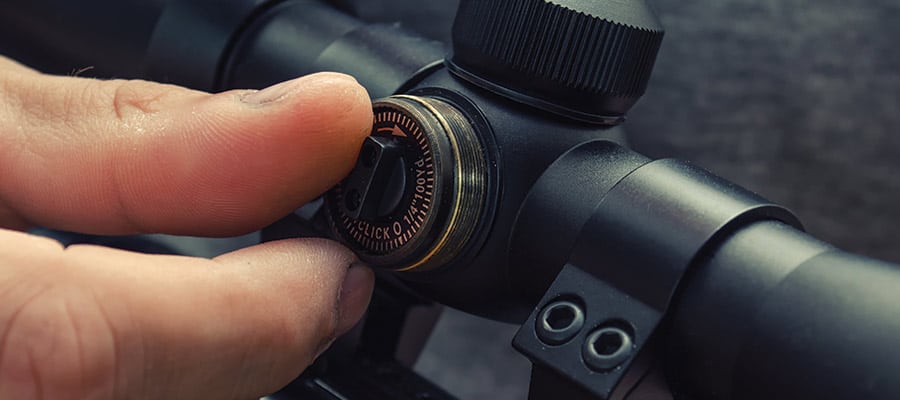
There should be two dials on your scope, one for left and right adjustments and one for up and down adjustments. It is possible that the dials are under a protective cover. Just remove the covers, and you will see something similar to the image below.

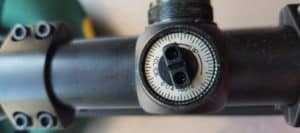
If you look the at the writing closely on the dial will tell you how much one click will adjust your impact point at 100 yards. In this case, one click moves the impact point 1/4 inch at 100 yards. Time for the math portion.
If we are zeroing at 10 yards and our impact point in 1 inch high, how many clicks do we need to turn the dial to the right? We know that to move a 1/4 inch at 100 yards we need to turn the dial four clicks but we aren’t shooting at 100 yards. So we know from 9th-grade geometry class that a pellet traveling downrange at a slight angle from the center will continually move further away from the center.
See the graphic below, and you will see that a pellet that missed the bullseye by one inch at 10 yards will have missed the bullseye by 10 inches at 100 yards. Confused yet?

We know from above that we would need to turn the dial a minimum of four times, but we didn’t factor for the actual distance from our targets. Since we are ten times closer to the target, we would need to multiply our clicks by 10, making it 40 clicks to the right. If our target were 25 yards away we would multiply by a factor of 4, so 16 clicks to the right.
(100/Target Distance) x (Inches from center/.25) = number of clicks
25 Yard Target: (100/25)x(1/.25) =16 clicks
30 Yard Target: (100/30)x(1/.25) = 13 clicks
35 Yard Target: (100/35)x(1/.25) = 11 to 13 clicks
I’m sure you see the trend here, the further away the target is during the zeroing the fewer clicks required to move the pellets point of impact.
This calculation will be done for both up/down adjustments and left/right adjustments.
The next five shots
This round of five shots should end up closer to the center of the target. Also, your shot group will likely be a little tighter.
Again, measure the distance from the center of your shot group to the center of the target and adjust the scope as needed.
Eventually, we will achieve the goal we set out to do, and that is for the aim point and the impact point to intersect.
The process could take a while if your shooting position changes from shot to shot.
So, if you haven’t achieved the goal repeat this step until complete.
Time for greater distance
It is not likely that you will be shooting at 10 yards for everything you do. So, in this step, you will want to increase your distance to the distance you think you will most likely be shooting. If you have read our articles on hunting, you will know that depending on your air rifle, a 25-35 yards shot is going to be your bread and butter range.
Once you decide on your distance, move your bullseye target to that distance and repeat the zeroing process. It would be good to measure the distance so when we do need to do conversions we have a good number for our calculations. Zeroing will go much faster this time around because we took the time to zero at 10 yards. In theory, your air rifle should be pretty well dialed in.
The most likely adjustments after increasing distance will be up and down. This adjustment will account for the pellet trajectory dropping as it travels over the increased distance.
…and like before, repeat this process until the aim point, and impact point intersect.
This is where we separate the fanatical airgun enthusiasts from the hobbyists. I only say this because you probably spent a bit of time sighting in your air rifle. The die-hards will want to test every pellet they have in their arsenal. Many of you will be content with using one type of pellet for target practice with your kids.
This next step is entirely optional. However, it is highly recommended if you plan to hunt.
Finding the optimum pellet for you
By now we should have an airgun that is zeroed in and shooting a tight shot group. Hopefully, five shot in the bullseye that will fit underneath a quarter ($.25) or about one inch.
Since not all pellets are created equal and I mean that literally. Every type of pellet is made with different lead alloy so each one will perform differently.
Now you are going to get annoyed with me here. Since each pellet is created from different alloys, we have to clean the barrel after each type of pellet used. Sending a few cleaning pellets downrange after each type will suffice, but this is a crucial step in the process. Your air rifle will perform better if you take the time to clean.
Select a pellet for testing and shoot twenty pellets downrange. After you lead the barrel with your new pellet choice, shoot five pellets into your bullseye target. If you don’t want to waste targets, draw a bunch of one-inch circles on the back of a target and try to get all five shots in a single one-inch circle.
After five shots, clean your air rifle and choose your next pellet. Repeat the process of leading your barrel and fire another five pellets.
You will find that at least one of the pellets performed the best. It may be the one you zeroed with initially. Even if it was, you get some extra practice time in, which is never a bad thing.
Conclusion
I wish there was a faster and easier way to zero an air rifle. I promise you I have researched a number of ways to zero a rifle and too many people go way into the weeds on why we do things. This zeroing method is geared toward the beginner who doesn’t need to know the physics involved in pellet trajectories. As you gain experience, you will learn the science. We would prefer to get you started on a successful path. Success will keep you and your kids interested.
If you purchased an air rifle to hunt, I urge you to take the time to zero your airgun. Dana and I are proponents of humane hunting. Meaning that when we shoot an animal, our goal is one shot, one kill. There is no need for unnecessary suffering on the animals part.
If you are taking your air rifle straight out of the box and heading into the woods to shoot critters, please rethink your choice and head to a range to zero your rifle instead.